Home Backup System – Best Cost Solution For A Portable Solar Generator.

I have been “doing my research” (wandering around the interwebs…), as people so often say these days, on what would be the best cost solution to provide electricity in an extended grid-down situation. I don’t want to spend the money it would cost to provide enough electricity to keep the house running as if the grid were still up – that would cost way more than $10,000 and isn’t a condition we have faced more than once. I live in the middle of the city of Saint Louis, MO, USA and our grid has been, and is likely to remain, pretty reliable, but I expect more outages in the future. So, what’s big enough to run a refrigerator, power our cell phones, some lights and maybe a fan? The best conclusion I can come up with is about 5kWhs of battery storage capability, with a 3kW inverter. I know a fair amount about solar, but not so much about batteries.

Will Prowse is a YouTube content creator who seems rather informed, though it’s not like he’s a professionally educated electrical engineer or an electrician. I can tell he knows a lot more about batteries than I do. I am going to trust his judgement and put together the system he recommends, which should cost me about $2,300 USD before solar panels, which will probably add $800 – $1,000 USD. It’s mobile, if we ever want that capability, it should cover more than just cell phones and LED lights and could provide a minimum level of comfort if the grid goes down for an extended period.

We already own two good sized battery packs – we have electric vehicles, and could draw electricity from them for a bit. The bigger car battery could probably run our large kitchen refrigerator for most of a day, but not a lot else. Of course, you can’t both use the power in the batteries for the house and drive at the same time, so that would have to be thought through in the case of a multi-day grid-down situation.

As you can see in the snippet above (picked up from our utility’s website), during the heat of summer, our house uses as much as 130 kWhs a day of grid-supplied electricity. Yes, that’s a lot; most likely about 75% of that is for central air conditioning. There is no way I want to pay for enough battery backup to supply that seamlessly, even without central air conditioning – just too much money. So the piddly little 5kWh backup system will only provide a minimum amount of our needs. Essentially, the grid goes down and we’re suddenly camping.

I have also looked into buying a used Tesla car battery – a ’21 had gotten into an accident after only using that battery for 3000 miles. I could have gotten that battery delivered to my house for about $4,000 USD, but I didn’t feel confident in my ability to build a backup system using a salvaged Tesla battery, so I stuck with the technically simpler option – the one demo’d by Will Prowse.

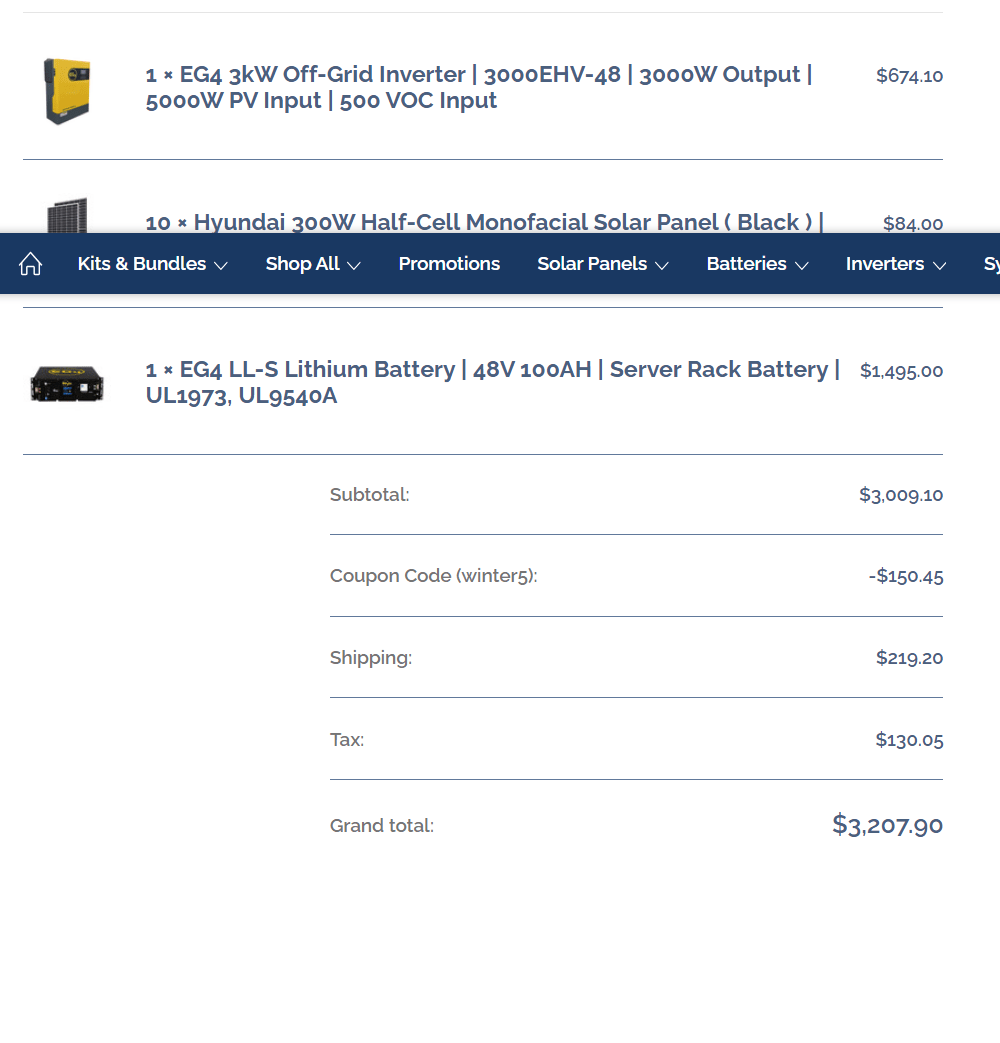
I purchased my parts – a 3kW watt all-in-one type inverter, a 5kW server rack battery and ten 300 watt solar panels on 12/14/2023 from Signature Solar, and you can see the prices below. I was told that I needed to order a minimum of 10 solar panels, which was a reasonable fit for this system, so I did, just for convenience. I could/should have shopped a little more for solar panels, but this was good enough.  I think Will Prowse recommends about 1200 watts of solar panel power as input for this system, but the 3kW generated by this string of ten 300 watt panels shouldn’t be too much for the 500 volt limit of the inverter.

It was a tough decision comparing my various options, but I think this is good enough to meet our needs for now and will have the advantage of lowering our electric bills a bit. BTW, this will be off-grid, not grid-tied. We’ll be powering some of our needs (notably our large kitchen refrigerator) from this system instead of the grid which will decrease the amount of electricity we’re picking up from the grid. The cost of grid-supplied electricity has risen substantially in the last ten years and I expect that will continue. $3,207.90 would buy a whole lot of grid-supplied electricity; the benefit of buying and using this system would be that it would help stabilize our energy costs during the life of this system and be very valuable in an extended grid-down situation. This isn’t the ideal situation for everybody, but it meets our needs.

What do you think? Please let me know if you have any questions or suggestions. And thanks for reading this far! 

Frost Looming? Bring In Those Green Tomatoes!

November 2nd, 2023 – USDA Hardiness Zone 6B (always check the zone when reading about gardening! What the author is saying might not apply to your location at all if they’re in a very different growing zone)

A hard frost ended the season here this week – temperatures below freezing for two nights in a row meant the end of the road for our outdoor tomato ambitions. I’m just putting up this blogpost to either remind or inform people that green tomatoes will (or at least might) ripen nicely if they’re brought in before the first freezing temperatures of the season and stored correctly. I did that for the first time last year and was pleasantly surprised at how well that worked out. Even very green tomatoes ripened nicely and were completely usable. The video that I watched on Youtube showed that tomatoes should probably not be stacked more than a single layer high; I stacked some in two layers (small tomatoes) and it seemed to be ok.

This blogger says that completely immature and shiny tomatoes will not ripen, which is bad news because this year most of the green tomatoes that I brought in are completely immature and shiny. I’ll do an update to report back whether the green tomatoes from this year ripened as well as the ones from last year. The pictures shown above are the tomatoes from last year (2022) in the picture on the left, and our 2023 crop of greenies on the right.

Don’t let those laggard tomatoes go to waste!

My Dad Is Looking Smarter All The Time, And He’s Been Dead For 10 Years.

I just binge-watched all 10 seasons of Homestead Rescue, a ‘reality show’ series on the Discovery+ channel, over the last month. If you haven’t watched it, a man of many talents, Marty Raney, and his two adult children travel to various homesteads around the United States and provide some support, guidance and major construction help to people trying to live ‘a homestead lifestyle’ which usually involves providing most, if not all, of their food, water, energy and security needs from the resources on their homestead property. I won’t drag you through the sad details, but usually these folks have tried their hardest to supply themselves with what they need to survive but have fallen short and need help to get into a better position. My dad didn’t make most of the errors that show up in the episodes of Homestead Rescue, and I never really appreciated how well he did.

My dad was a visionary who was a generation ahead of his time. He was NOT a back-to-the-land hippie, though he shared their interest in living off the land and organic food; he was part of The Greatest Generation and grew up in the city. Even though he was saddled with 11 kids to feed and clothe, he managed to spend some time and effort working on providing heat from wood grown on our property, put a whole lot of beef, chicken and pork in our freezers and grow a lot of organic produce. We built a new house from mostly used materials (bricks, doors, windows, flooring and wood from buildings that were being torn down in the 70’s) and we did that almost entirely without professional help. They had little to no mortgage when we moved into that house in 1974. Dad chose a spot to build the house on top of a large hill, which seems to have prevented so many problems that show up on Homestead Rescue, so we never had water drainage issues. He built a 6 bedroom, sturdy, well-insulated home that has withstood high winds and big storms for over 50 years now. We had big vegetable gardens that produced a lot of food, which we ate, froze or canned. We needed 2 big chest freezers for years to preserve the bounty. With no mentor or a Marty Raney to swoop in to help, we raised chickens, ducks, geese, pigs, goats, cows and a friendly but rather worthless dog. Pops just figured it out, somehow. He always wanted to get solar power, but could never afford it, and never learned about DIY solar thermal. Every episode of Homestead Rescue brought up some issue that Dad had avoided in advance, by good judgement. He bought land in an area with good rains, low predator presence, good roads and proximity to amenities like hospitals and jobs. He got a good deal on the land by buying a big farm with his in-laws, splitting the place into 3 parcels and building a house from used materials.

I highly recommend the Homestead Rescue series, but my dad was one homesteader who never needed them.

I’m A Bloomsday Prepper And You Should Be One Too!

Are you as tired of bad news as I am? There is just no shortage of bad news related to the 8 billion humans now living on this planet, and it’s kind of our fault. We go to the news sites and click on the worst, most alarming headlines first – and it’s not a new phenomenon. The term “if it bleeds, it leads” is not a new concept. So it’s not a surprise that the news media focuses on bad news – a flood in the Democratic Republic Of Congo gets more attention since it killed about 140 people than an announcement of new housing for the homeless being funded in Saint Louis.

So, fear abounds in a time of relative, by-historical-standards prosperous time, which has given rise to the doomsday prepper movement that is increasingly well-known as one crisis after another goose steps across our collective screens. I’ve been observing this movement, from a distance, for quite a few years and have found some of their work to be fascinating, to the point that I’ve tried to learn about how I might incorporate some of the techniques into my life, but for rather different reasons.

I think it’s a really good idea to be more prepared for loss of expected goods and services – like food, electricity, water, etc. I have mostly just expected those things to be easily accessible and they more or less have been, with a few notable exceptions. Things are changing, as usual, and prudence dictates that I change my habits to adapt. I’m trying to grow more food, produce more of the energy I consume, and learn how to thrive when the supplies I’m used to having aren’t available.

Being more prepared to be able to be resilient in the face of crisis is what I’m calling a bloomsday prepper because I think that we’re all in this together, and we’re stronger together. I have enough food for a couple weeks, some ways to generate electricity, ways to cook without the grid being up, water catchment, some basic medical supplies and relationships. I can run some electrical devices from the battery packs in our electric vehicles. What resources do you have? Look around, assess what you have and add a few things over time. You, too, can be a bloomsday prepper!

The Thrill Of Vacuuming Varmints

In the pictures above you can see my current hydroponic empire – a Tupperware container in the upper drawer of an old file cabinet – and yes, I should do a separate blog post on that. One of the big benefits of having this hydroponic setup in a file cabinet is the complete lack of pests even though I’ve been growing food in there for more than 6 months and have had serious pest problems when growing food in other parts of the house. A couple weeks ago I noticed really tiny black bugs were crawling around in my lettuce empire, and I was quite surprised – how could they have gotten there?? I got that answer about a week later when I suddenly had a large contingent of tiny flying black bugs rise up like a dark cloud when I opened the file cabinet drawer to inspect the crop. I tried killing them by hand, which had a pretty low success rate, and then I remembered the vacuum that I had purchased for squash bugs. Voila! Victory over diabolical bugs was swift with my vacuum! What a feeling of satisfaction; not something I feel all that often related to gardening.

I bought this lightweight vacuum off of Amazon.com but it’s probably available from a lot of places. At only about a pound and a half in weight this vacuum is super easy to use even with my arthritic hands. This is the first time I’ve used it to murder my enemies, but it sure worked well with this first try.

“I really Should Have Paid More Attention To My Italian Grandmother”, Or “Making Tomato Sauce From Scratch Guided By Somebody Else’s Grandfather On Youtube”

I really enjoyed the video of an Italian American grandfather making tomato sauce from scratch – “Traditional Homemade Tomato Sauce made by Pasquale Sciarappa”. Here’s the video, if you watch it and decide to try to make it his way, here’s my best interpretation of his instructions.

Let tomatoes rest 2 – 3 days after picking.

Wash Roma or San Marzano tomatoes well.

Cut off bad spots and the crown, as well as any internal ‘yellow’ spots, which are part of the crown/stem.

Cut in half, squeeze out seeds and liquidy-stuff in the interior of the tomato

Put in pot, cook over medium heat (??? just guessing) for about 45 minutes, then use very slotted spoon to pull solid tomato parts out of the pot – discard the liquid left behind??

Scoop tomato solids (??pulp) into strainer, let drain for a couple minutes

Run tomato solids (pulp) through a vegetable strainer machine that will quickly separate the skins and seeds from the rest of the tomatoes.

Compost the seeds/skins, or otherwise dispose of them.

Pour the tomato pulp from the straining process back into the pan on the fire and cook down for 3 to 4 hours, depending on how thick a sauce you prefer. Cooking longer yields a thicker sauce. A wood fire is used to do the cooking in this video, so I can’t quite say at what temperature the sauce mixture should be cooked, but it’s not boiling. Lots of steam is coming off the pot, so it’s more than a very low heat, so maybe a low simmer?

After 3 hours of cooking down the sauce, add salt to taste, stir.

After 4 hours, ladle hot sauce into clean jars. Probably a good idea to use a funnel, keep the top rims of the jars clean, fill to about an inch from the top. Put about 2 fresh basil leaves per jar, push the leaves down into the jar of sauce with a spoon.

Place canning lids onto jars after checking to verify that the tops rims of the canning jars are completely clean. Screw canning jar bands somewhat loosely onto jars.

Let the jars sit for an hour?? I can’t quite tell, but I think he lets the jars sit for an hour before he screws the canning jar bands tightly onto the jars. But maybe not, because he wants these to continue to ‘cook’ under a blanket in the next step.

Place the filled jars close together into a short-sided cardboard box and cover tightly with a very warm blanket, covering the top, sides and bottom of the box, let sit for 3 full days. Or maybe he said 3 or 4 days? I’m not quite sure.

He doesn’t do any water bath boiling of the jars, which is pretty forbidden in the official Bar Jar Canning manual. Hasn’t killed him yet, and he says he’s been doing it since 1939.

Lock Your Doors. It’s Zucchini Season.

My brother told me years ago that someone told him that people in their small town didn’t lock the doors on their cars except in August. My brother said “why do people lock their car doors in August?” to which the reply was something like “because that’s when the zucchinis are ripe and if your car door is unlocked you might come back to a car full of zucchini”.

I can’t grow useful crops very much or for long, but boy, is it zuchini season in our middle east* raised bed! It was certifiably hotter than hades yesterday so I didn’t go outside, and you see the result above.

I also harvested some stevia, basil and mint to dry for later use. Being able to process fresh-from-the-garden food is critical to making a garden really useful. My garden doesn’t produce on demand – it’s not providing basil in December, for instance – so learning the best way to preserve food such that it provides sustenance when needed is critical. I suck at that too, but hopefully am learning.

Something else I learned is that the person who told me that stevia is hard to grow from seed wasn’t kidding. I saved a bunch of stevia seeds from my plants last year and planted them all this year – which netted me exactly zero stevia plants. I did a germination test beforehand and a fair number of those seeds germinated, but the overall germination rate seemed quite low – maybe 10% – 20% or so? It’s kind of hard to tell the seeds from the other fluff that grew around them, so maybe some of those specks weren’t actually seeds, meaning that the actual germination rate was higher? I’ll try again next year, focusing more on keeping the seeds in damp conditions until well after germination.

So if no stevia seeds germinated, how was I able to harvest some stevia for the picture above, you ask. I hedged my bets – I bought a couple stevia seedlings and planted those in a container, where they are doing just fine. It’s always a good thing to have a backup.

*We have 6 raised beds and we refer to them as either east or west, and top, middle or bottom, hence one bed is the middle east one.

Did I Do All This Work Just To Be Murdered By Vinegar?

I have been hearing so much from the interwebs about the benefits of fermented foods that I decided to buy some equipment (spending money is always the first step, right??) and give it a try. I bought a Mason Jar Fermentation kit like this (I don’t have any affiliate relationship with anybody, so wouldn’t make money from somebody clicking on that link) and put the parts I cut off of a pineapple – peels, mostly – into these jars and waited. I probably waited months (kind of forgot about them in the dark cabinet where I had parked these jars) and now I’m afraid to actually consume them. How do I know this stuff is safe to eat?

Stacy says it’s probably ok, as does Sandor, but I didn’t follow directions carefully. I let this ferment much longer than any recipe suggests. Based on their descriptions of kahm yeast, I think that’s what’s growing on these jars of fermented pineapple scraps. But there’s an old saying related to food in a questionable state : “when in doubt, throw it out”. I just let this stuff sit too long in an unrefrigerated cabinet so I’m tossing this batch, and will try again with the next pineapple, hopefully following directions a little better.

I think people share as well as they can in youtube videos to help others in learning new skills, but often there are a lot of questions left unanswered, and people like me, just picking stuff up on the internet, need to proceed with caution.

Sharing Solar-generated Electricity in Bangladesh – Could This Be Useful In The U.S.?

I saw a pretty interesting youtube video about a system (hardware and software) being sold in Bangladesh which links multiple solar PV systems together to form a mini-grid for off-grid people. And here’s a link to an article that explains the details of SolShare’s system. According to the youtube video almost 20 million in Bangladesh use solar power now, and Bangladesh has one of the largest number of solar PV systems in the world; I haven’t verified if that’s actually true or not, so don’t quote me. A company named SolShare has developed a piece of hardware and associated software to allow customers to form Peer-to-peer microgrid systems. One of the crucial services provided by SolShare’s system is the ability of people who are sharing electricity with their neighbors to be able to accurately charge their neighbors for electricity that leaves the solar PV owner’s system. It seems like a great idea, and theoretically should work well in Bangladesh – but is there any instance where this would work well in the United States? For this to work, you’d have to have a lot of people who are off-grid living quite close to other people living off-grid. I don’t think that’s common now, but maybe eco-villages might have an interest in this type of technology? Peer-to-peer sharing of energy between households is pretty far off in the United States, but this is an interesting concept.

Solar Thermal Hot Air Boxes Must Have An Airtight Seal On The Outlet Duct!

There are solar thermal hot air boxes (STHABs) videos and write-ups all over youtube (videos) and BuildItSolar.com (pictures& text) that show how to make them yourselves for maybe a couple hundred dollars USD (or even a lot less if you have the right stuff laying around) but I have yet to find one that includes an airtight seal for the inlet/outlet ducts. An airtight duct seal makes the difference between getting free heat in the dead of winter and getting free heat AND unwanted free freezing air conditioning in the dead of winter. The laws of physics are pretty reliable, and they work the same way during a sunny day and a dark freezing night – air temperature is changed by what the exterior environment is doing to the inside of the the solar thermal hot air box. On a sunny day, the sun sends photons through the glazed front of the solar thermal hot air box, which hits something that changes the sunlight into heat, and thereby heats the air being moved through the STHAB (solar thermal hot air box). In the middle of a freezing cold winter night, the ambient temperature will chill the interior of the STHAB and thereby chill any air that passes through it. You would wipe out any benefits from the daytime heating if you don’t have an air-tight seal covering the exit duct during long winter nights. You might not care about that if the STHAB is just being used to provide heat during the day to a place that won’t be negatively impacted by severely cold weather – for instance, if this is attached to an unheated shed/garage with no plumbing or items that will be damaged by freezing temperatures. This also doesn’t apply to STHABs that are entirely inside a conditioned space – in that case, the cold doesn’t get to it, and it doesn’t become a cold generation machine.

The STHAB shown in my picture is a commercially made box, from Northern Comfort / Sunsiaray, but I think the guy who made them retired in 2018?

I also made one myself, which my brother sort of remade, but that is not as good looking, and probably not as productive, though I haven’t been able to test that carefully. I used two old window sashes that I got for free as the front glazing, which has the benefit of being able to easily withstand the heat generated inside the box on a sunny day, though putting a sheet of Lexan over those window sashes would trap more heat inside the box, and thereby make it more productive. If you do a really good job of building one of these boxes and then put an acrylic or polycarbonate sheet on the front of it, instead of a glass sheet (window sashes, screen door, etc), you run the risk of that potentially expensive sheet melting. I was able to measure temperatures of over 200 degrees Fahrenheit coming out of my homemade STHAB on a sunny day when no fan was running, and how long would polycarbonate or acrylic stand up to that?

This is really great and durable technology, and I encourage you to give it a try, but remember to make sure you have an airtight seal on the ducts when the sun is not shining on it!